
Ever driven around a hunting property and taken note of dozens of spots primed for a hunting stand? If you’re a deer hunter, I bet you have. It’s somehow part of the DNA makeup for those that chase America’s most popular game animal. Low-limbed oak canopies, sweeping cedar limbs running horizontally near the ground, and stands of deadfall limbs. It’s these and assorted other spots where nature has already given you a head start on the very site from which you could encounter and arrow your next buck.
Deer hunters, scouters and, to a lesser degree, photographers, go to great lengths, perusing the many Taj Mahal-like deer blinds on the market.
Insulated walls, elevated platforms, bells and whistles such as gear compartments and even cup holders. They likewise scan feed store lots and internet sites for the huge variety of blinds, tree stands, and, these days, saddle systems that will take their adventures to the next level.
There are so many manmade alternatives out there, your head will spin.
Most of them talk the talk too, offering comfort and stability. They are box seats for the main act, big whitetail bucks. For that reason, I won’t even bring up the cost. After all, they do what they say and their utility is righteous.
However, in the most basic sense, a hunting stand or blind is a shelter that provides cover and a good vantage point for hunting and harvesting game. Nowhere is there an official definition that reads; “A box or perch professionally constructed of wood, metal, synthetic materials, or all-weather camo cloth”.
I’ve looked…
Well before retail hunting blinds were made, hunters used components of the woods as their blind. This included not only twentieth-century deer hunters but earlier Native Americans. Before that, prehistoric man did the same. It worked. To eat, it had to.
Today, some hunters still construct ground blinds, though, for most, it’s a lost art. I shot my first whitetail at 40-yards from behind a stack of dead limbs. With big eyes and a booming heartbeat, I was as novice as they came – and I got it done thanks to a 30-30 rifle and a couple of rotted hackberry trees.
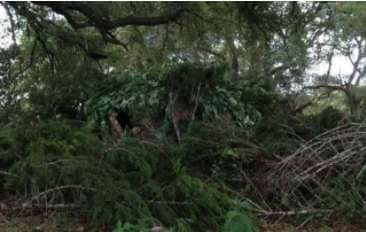
This native ground blind provides complete concealment with a variety of cut cedar branches and other brush.
Ever since that magical morning, I often choose to hunt from native ground blinds.
Many of them hunters, digiscopers are no different. For those realizing the benefits of capturing and recording the game animals they hunt, good dependable cover is paramount to success. It should come as no surprise, as digiscoping potential quarry is no different than hunting. To effectively fulfill your mission, you’ve got to stay concealed. You also have to maintain a steady position to operate your optics, smartphone, and digiscoping gear.
Here are some basic tips and methods for building and employing a native ground blind from which to capture and record the animals you seek through digiscoping.
Needed Tools
For digiscoping the following tools can help up your digiscoping game:
- Binoculars or spotting scope
- Phone Skope Adapter
- Smartphone (fully-charged)
- Tripod (recommended)
- Portable charging bank
- Lens cloth
For your blinds consider looking into the following tools:
- Small limb saw
- Bypass pruners
- Zip-ties
- Flexible field wire
- Scissors
- Work gloves
- Folding hunting or camp chair
- Cattle panel or field fencing
- T-posts or U-posts (optional)
- Camo or weed cloth (optional)
- Bolt cutter (optional)
- Wirecutter (optional)
The Importance of Location
From the onset, choose a site that has even terrain, decent sight-lines of the area, and adjacent features attractive to deer. Seeing at least a fairly long distance in a direction or two is essential for digiscoping. After all, your goal is to magnify faraway images. Ideal area features include any combination of heavy trails, funnels, and food and water sources.
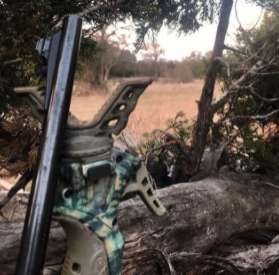
This shooting gear could easily be traded for a digiscoping set up in this central Texas native ground blind.
Position the stand with the sun in mind. If possible, face it enough north and south to where you won’t be scouting in the morning or evening with blinding sunlight in your face. For scent control, you’ll want to use it with prevailing winds in your favor, so take this into account as well.
Finally, seek out an area that provides a head start. For example, in the Texas hill country, there are often blocks of cedar trees sporting long horizontal branches. As such, I look for those that are only a few feet off the ground under which to position myself. I then build around it. You can do the same by using the existing live low-lying brush as the “front” of the structure.
Native Elements
Whether you have anything sitting overhead or not, you need the front wall to have some sort of structure. You have options here. As mentioned, you can use existing live brush as the front and build around it. If not, you can assemble large tree branches or fallen trunks as the “base structure for the front. You’ll want sides that are likewise made from native live or dead brush.
Once the main structure has been set in place, assume a seat behind the barrier and determine the comfortable height for viewing. If you’ll be using a tripod, set it up as a test. Next, native limbs and grasses can be used to fill in the gaps, leaving shooting holes at the correct height in the location(s) you desire. Zip-ties are great for attaching the native brush. Another alternative is light-duty field wire.
Man Made Elements
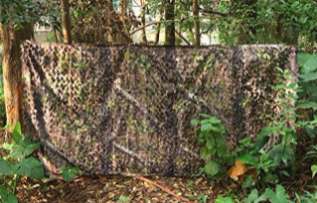
You can start your blind with camo cloth and then add native brush.
Hey, there is nothing wrong with “cheating” a little. There are so many items on the market and next to the shed that can be used in conjunction with native elements in the field. One of my favorite methods is to bow a section of cattle panel or field fencing around t-posts in a u-shape. It can be bound with flexible field wire. From there, I attach retail camo material or weed cloth to it. From there, viewing holes can be cut with bolt cutters and scissors and the blind can be accessorized with zip ties and a few cut branches from the area. You can also set large limbs against the structure for an additional instant breakup effect.
No matter how you construct your ground blind, make sure there are standing tree trunks or thick cover directly behind you to avoid any silhouetting effect. If it’s not there, add it with either more native brush or camo cloth.
Additional Tips
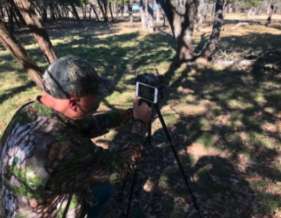
Don’t build your native ground blind before first viewing height and comfort.
First off, treat your digiscoping sessions as hunts by minimizing movement and sound. To that end, set up your digiscoping gear in a comfortable position at the very start of your sit and be ready. You don’t want any abrupt movements at the moment of truth. Also, if you haven’t already done so, upon setting up, take a little time to clean the floor of excessive leaves or brush that will make sound when you move.
Native ground blinds are a great vessel for viewing deer and other game in their habitat. Further, there is no better way to enjoy nature than hunting and scouting in the open air. So, use your creativity and add a native stand to your digiscoping repertoire. It’s only natural.